I’m trying to install UC20 on a virtual machine but I can’t make it work.
The idea is to simulate the installation of UC20 in a workstation while adding some tweaks to a custom image. For now, using the uc20 image from Ubuntu has not been productive at all and I don’t know why, and I had no issues with uc18 using the same procedure.
The procedure that I follow is this one:
First, I boot a virtualbox machine from a USB that contains a live ubuntu desktop (using Virtual Machine USB Boot tool). This USB also contains in a folder the .img form uc20. Using this image and the dd comand the OS is written on the virtualbox hard drive.
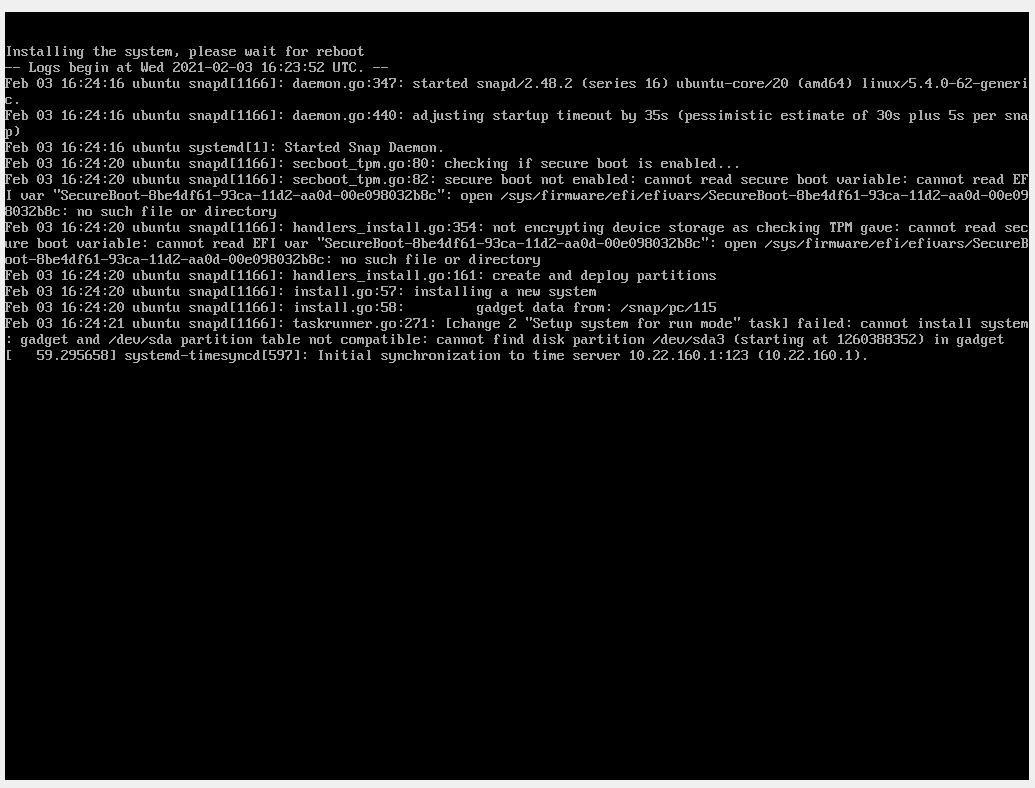
Apparently, everything is correct, it creates two partitions:
/dev/sdb1, 1M, with Type BIOS BOOT
/dev/sdv2, 1.2G, with Type EFI System
But when I reboot, it pops an error: no such device ubuntu-boot, and it pops the invalid signature followed by the GNU Grub with Recover, Install and UEFI Firmware Settings. All three fail.
The issue here is probably that your VM is setup to boot in BIOS mode, but UC20 requires booting in UEFI mode. I’m not familiar with VirtualBox, but I assume there is some checkbox or something where you can enable UEFI mode for your VM this way.
I got that thing sorted out. Instead, I have a question about UC20 itself.
I mounted a custom image manually to check which partitions has (never booted that image), but for my surprise, it only mounts two partitons, and there is no sign of /writtable.
After that, I booted the image in a Virtual Machine and after the configuration and successful ssh, it does have /writtable. Does that mean that unless you configure a user with a SSO, the image does not create the /writtable partition? I want to skip the console-conf, so I tried to create a file just as it says here. Isn’t that possible anymore (–disable console-conf is deprecated in uc20) and I’m forced to create a custum gadget to skip console-conf?
In 16 and 18 the /writable partition was pre-created and just grown to full size of the disk during first boot. With the introduction of full disk encryption this has changed and the partition is actually freshly created (and encrypted if possible) during first boot instead.
To skip console-conf in UC20 you need to set service.console-conf.disable from a defaults: entry in your gadget.yaml now (since you can not randomly tinker with the (non-existing) filesystem anymore which the ubuntu-image option did) …
then using my model (which is this one) and adding the extra snaps the one i’ve just created, generate the image, right? Should I remove from my own model the pc-gadget, as i’m modifying the one that i’ve got from git? Also, should I change the grade of the model?
you should just point to your locally built gadget snap with the --snap argument in ubuntu-image, for UC20 i think you also need to make your model “dangerous” but keep the pc-gadget entry …
I’m struggling a bit with an error that I get when building the pc-amd64-gadget. Even without modifying any file, it fails to build grub, here is the error.
Any ideas? Haven’t touched any file at all. (I’m doing this step from a laptop, form the vm i can not make it work, it gets frozen every single time, could it be that it does not have secure boot enabled and it tries to copy a file that does not exist?)
Due to the issue @ogra described in that post, I would recommend for folks trying our gadget snaps to just unpack the upstream gadget snap and modify the files from that snap and repack it with snap pack rather than try to build natively with snapcraft. So something like this:
$ snap download pc --channel=20/stable --basename=pc-gadget
$ unsquashfs -d pc-gadget pc-gadget.snap
$ # edit ./pc-gadget/meta/gadget.yaml to your desire
$ snap pack pc-gadget --filename new-pc-gadget.snap
$ ubuntu-image snap --snap pc-gadget.snap model.assertion
I’ll try that too. At least I got it running, but I had to include the wget package and override-stage section of shim-signed_1.43+uc20.4+15+1552672080.a4a1fbe-0ubuntu2_amd64.deb, since it was impossible to me to get it working without it, unable to find the shim-dualsigned , just like the issue in the link ogra provided, using the pc-amd64-gadget snap, (i’m building it from a ubuntu desktop 20.04 os, maybe that’s what is wrong here?).
Hi guys, new issue. I did a system-user assertion using make-system-user using the same key as the one i used to sign the model. Apparently it does not work and since a few days ago, the documentation on how to make a system-user is gone. Only mentioning that we should use snap create-user, and using snap create-user <email> gives me access denied. Using sudo, it gives me “error while creation user: system user administration via snapd is not allowed in this system”.
Sorry we are in the process of moving our docs around, hence why you may have noticed some things moving around or appear to be missing. Please flag us if you can’t find anything you thought was there before.
This is wrong, I will look into why that note is there and remove it. Where you can put a system user assertion has changed but they are very much still supported and work for UC20. Off the top of my head, the main change is that you can no longer put them on non-removable partitions like ubuntu-seed, etc. and have to put it on a specific removable media storage like a USB drive, etc.
This is likely because you created an account with console-conf, and hence are already managing the device, and we don’t by default allow you to create another user account from the command line with snap create-user if there is already a “system user” on the account (console-conf also calls create-user internally, which creates your LP user as the “system user”)
Apparently creating a new key and registering it fixed this error. Nonetheless, when I create a system user, it pops an error, although it creates the user assertion.
error: cannot sign assertion: cannot sign using GPG: /usr/bin/gpg --personal-digest-preferences SHA512 --default-key <mykeyID> --detach-sign failed: exit status 2 ("gpg: WARNING: unsafe ownership on homedir '/home/zap2x/.snap/gnupg'\ngpg: signing failed: No such file or directory\ngpg: signing failed: No such file or directory\n")
Done. You may copy auto-import.assert to a USB stick and insert it into an unmanaged Core system, after which you can log in using the username and password you provided.
That means that the even if the user assertion is created but does not include the one i’m trying to create, it will never be created in the device where I insert that assertion, right? Since it cannot sign with my key, it will do it with one of the cannonical?
How do I fix this? Is it just a permission issue fixable with chmod? both the /gnugp and its contents belongs to my user and the permissions are set as follows:
zap2x@LaPajareria:~/Desktop/newUC20$ ll /home/zap2x/.snap/
total 16
drwx------  3 zap2x zap2x 4096 feb 12 10:49 ./
drwxr-xr-x 33 zap2x zap2x 4096 feb 12 10:59 ../
-rw-------  1 zap2x zap2x  163 feb 12 10:49 auth.json
drwx------  4 zap2x zap2x 4096 feb 12 11:07 gnupg/

zap2x@LaPajareria:~/Desktop/newUC20$ ll /home/zap2x/.snap/gnupg/
total 32
drwx------ 4 zap2x zap2x 4096 feb 12 11:07 ./
drwx------ 3 zap2x zap2x 4096 feb 12 10:49 ../
drwx------ 2 zap2x zap2x 4096 feb 12 10:56 openpgp-revocs.d/
drwx------ 2 zap2x zap2x 4096 feb 12 10:56 private-keys-v1.d/
-rw-rw-r-- 1 zap2x zap2x 3828 feb 12 10:56 pubring.kbx
-rw-rw-r-- 1 zap2x zap2x 2562 feb 12 10:54 pubring.kbx~
srwx------ 1 root  root     0 feb 12 11:07 S.gpg-agent=
srwx------ 1 root  root     0 feb 12 10:22 S.gpg-agent.browser=
srwx------ 1 root  root     0 feb 12 10:22 S.gpg-agent.extra=
srwx------ 1 root  root     0 feb 12 10:22 S.gpg-agent.ssh=
-rw-r----- 1 zap2x zap2x  676 feb 12 10:46 sshcontrol
-rw------- 1 zap2x zap2x 1360 feb 12 10:56 trustdb.gpg